Homelab Adventures Part 2 – Working with Ubuntu Server
The first step to get started with any machine is booting the operating system. I chose to go with Ubuntu Server as the operating system for my homelab for several reasons. The first of which is that I only run a single machine, so something like ProxMox, which helps coordinate containers across multiple machines, would be overkill. Second, Ubuntu Server has no desktop interface, and thus has less overhead. Finally, I wanted to learn more about the command line, and what better way to do that than an operating system that works exclusively with the command line.
Some other recommended operating systems if you don’t want to use Ubuntu Server are:
- ProxMox
- TrueNAS
- unRAID
- CasaOS
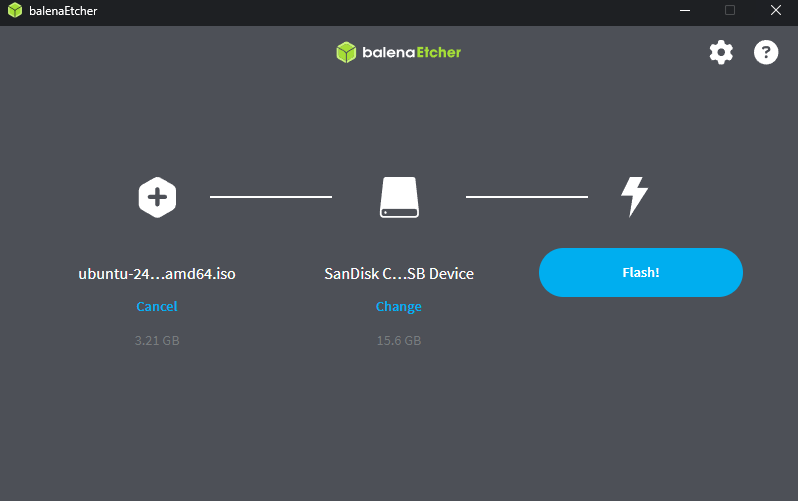
To get started with Ubuntu Server, you need to create a boot image. I used balenaEtcher to do so. balenaEtcher has a nice interface where you simply select the iso file you want to use and the USB device you want to write the boot image to, and that’s it.
Once you have the boot image, you are ready to begin setup of your homelab. First, connect a keyboard and mouse to the PC. Next, power it up. This mini PC comes with Windows by default, so you will need to go into the Bios with the F7 or Del keys and change the boot order. Make sure that USB boot comes first. Next, plug in your USB and restart. Also, make sure you are connected via Ethernet, it will be helpful later. You should see the Ubuntu installation screen.
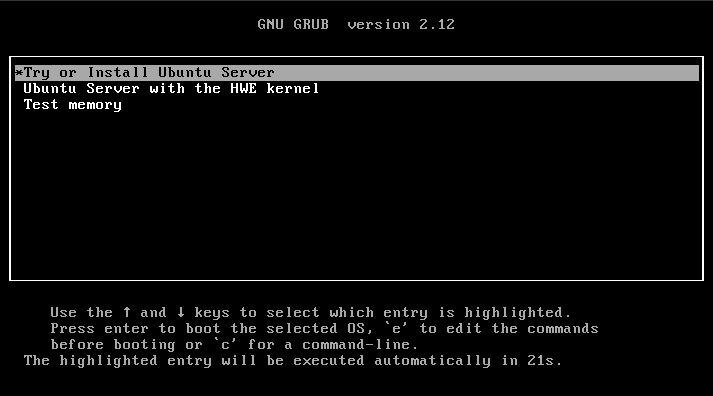
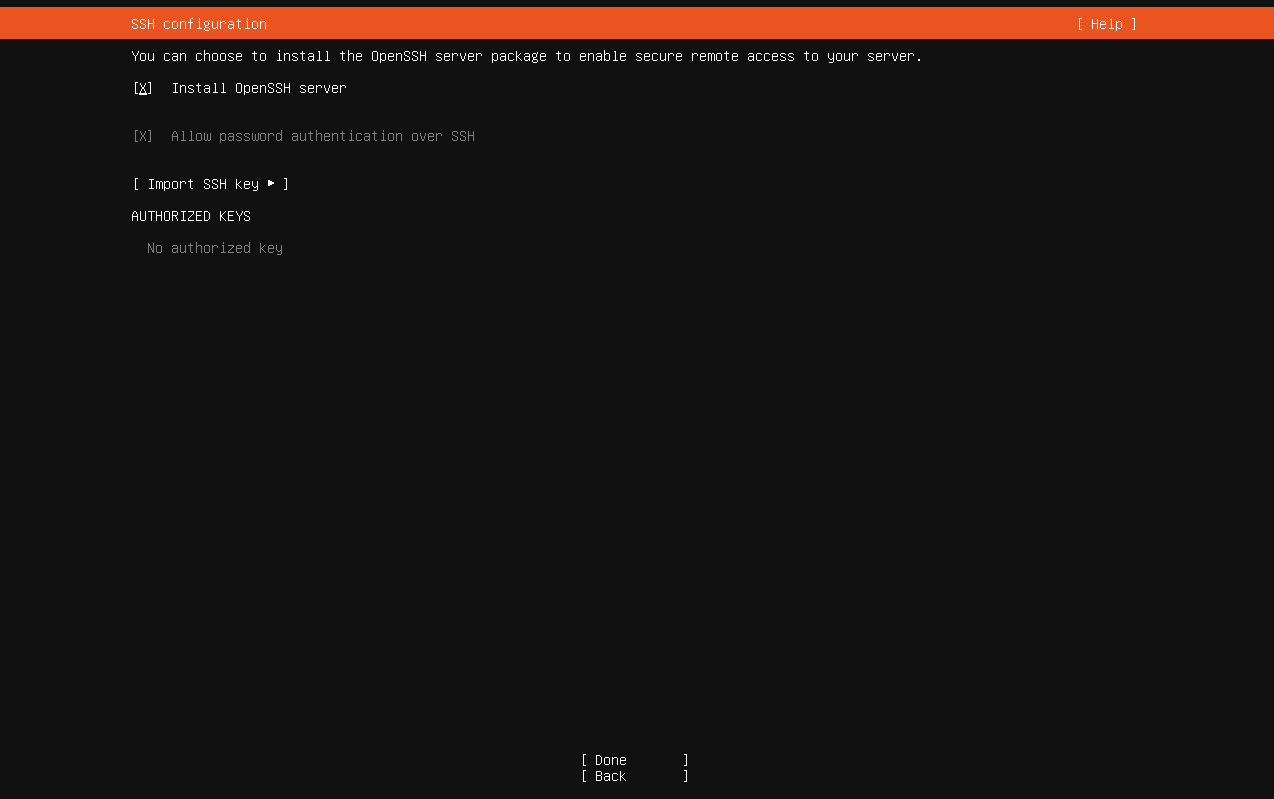
Click on “Try or Install Ubuntu Server” and follow the instructions. It will start setting up everything for you. It may ask you about partitioning: I would select the option to dedicate the entire disk to /, which is the Linux root file system. I left some space unallocated when I did this initially, and ended up having to change it later. It will ask some other stuff too. For the most part you should be okay going with the defaults, but if you see something you are unsure about, I would look it up. One big thing to include is the OpenSSH server, this will help you connect to the machine remotely later. On the next page for popular server snaps, the only one you should need is Docker.
After rebooting, you should have a working Ubuntu Server machine with Docker and OpenSSH-Server installed. There are some final setup steps we need to do. The first thing I would do here is to make your IP static. Your entire setup might break if not, especially if you are running an internal DNS service like Pi-hole on this machine. Use your preferred text editor (mine is nano) to edit /etc/netplan/50-cloud-init.yaml. You want to turn off DHCP4 for whatever interface you have connected to. This will be either enp2s0 or enp3s0, check which one you have an ip address with using ip a. After that, you should define a static IP address instead. Below is an example of my netplan configuration.
network:
  version: 2
  renderer: networkd
  ethernets:
    enp2s0:
      dhcp4: true
    enp3s0:
      dhcp4: false
      addresses:
        - 192.168.86.2/24
      routes:
        - to: default
          via: 192.168.86.1
      nameservers:
        addresses: [8.8.4.4, 8.8.8.8]
You can see that for enp3s0, the network interface I am using, I have a fixed private IP address. After changing this document, you should run sudo netplan apply. Ubuntu has a lot more information about this, as well as other networking tips, in their documentation. As a footnote for anyone using Google Wifi like I do, an alternative is to go to Wifi -> Network Settings -> Advanced Networking -> DHCP IP Reservations, click on the + button, and then find your device by name and assign an IP address to reserve.
The next step is to finish setting up OpenSSH, which includes creating the SSH keys to allow access without a password. SSH, or the Secure SHell Protocol, allows you to connect to your homelab remotely. There are a lot of resources on how to do this online, so I won’t talk too much about it here, but a great source is once again the Ubuntu documentation. Once you complete these steps, you should be able to access it from clients using the following command:
ssh user@ip
where the user is the user you configured in the above process and the ip address is the static ip you set for your homelab. If not, you can run sudo ufw allow 22 to allow connections to port 22, which is the one for ssh connections. Once you have confirmed that you can successfully ssh into your PC, you can remove the keyboard and mouse and move the machine to its designated storage area.
Next, you should confirm that Docker was installed properly. Run docker and docker compose, and make sure both of them give you documentation. You will need them later.
There is the completely optional step of changing your shell using Oh-My-Zsh. I find it a much nicer shell to use than bash. The default ~/.zshrc settings allow you to see what git branch you are on and changes the color of the text showing what directory you are in, which is useful for visual reasons. You can also add zsh-autosuggestions, a plugin that autocompletes frequently entered commands for you. Oh-My-Zsh has a lot of other plugins and themes that might make life easy for you.
Finally, if you are storing a lot of media on your server, you might want to add in hard drives for some extra space. This is great if you run Jellyfin or Plex, for example. Of course, you can always connect each hard drive individually, but you can get a lot of advantages by configuring RAID with concepts known as parity and striping. A little bit about each RAID level is described here.
If you are using the same mini PC I did, then you only have two hard drive bays and thus are limited to RAID 0 and RAID 1. RAID 0 will split data onto both hard drives, what is known as striping. That means that, when reading and writing, it is not limited to the data throughput of one of the disks and instead uses both, increasing the speed of those operations. RAID 1 is what I have configured, and it will mirror the data from one drive onto the other through a concept known as parity. This maximizes uptime, because if one drive fails, your data is still intact on the other, and your PC keeps running. However, this has the obvious downside of your storage capacity being effectively halved. This means that your selection between RAID 0 and RAID 1 depends on whether you value efficiency or reliability in your setup. I went with RAID 1.
To create a RAID setup, I used a utility called mdadm. DigitalOcean has a great tutorial on this.
Now, you should have a machine fully set up with Docker and software RAID, that you can communicate with remotely with SSH. Next, I will go over the basics of docker compose files and how to make your first container.


Leave a comment